In my previous post i looked at how it was easy to me creating project with SBT. I also discussed multi project build with SBT. Now i learn how to create plugin for sbt project. A plugin is a way to use external code in build definition. A more typical plugin will provide sbt tasks, commands, or settings. This kind of plugin may provide these settings automatically or make them available for the user to explicitly integrate.

Using SBT Plugins with your project
For adding plugins in your project, create a file plugins.sbt under /project/plugins.sbt with the desired sbt plugins, general dependencies and repository. For ex.

resolvers += "Typesafe repository" at "http://repo.typesafe.com/typesafe/releases/"
addSbtPlugin("play" % "sbt-plugin" % "2.0.2")
ddSbtPlugin("com.typesafe.sbteclipse" % "sbteclipse-plugin" % "2.0.0")

Lets us quickly see how to design plugin,
To make a plugin, create a project and configure sbtPlugin to true such as

D:\sbtpluginDemo>sbt
[info] Set current project to default-6a95a2 (in build file:/D:/sbtpluginDemo/)
> set sbtPlugin :=true
[info] Reapplying settings...
[info] Set current project to default-6a95a2 (in build file:/D:/sbtpluginDemo/)
> set name :="demo-plugin"
[info] Reapplying settings...
[info] Set current project to demo-plugin (in build file:/D:/sbtpluginDemo/)
> set organization :="org.knol"
[info] Reapplying settings...
[info] Set current project to demo-plugin (in build file:/D:/sbtpluginDemo/)
> session save
[info] Reapplying settings...
[info] Set current project to demo-plugin (in build file:/D:/sbtpluginDemo/)
> exit

The contents of a plugin singleton declared like object PluginDemo, PluginDemo.scala resides in /project/PluginDemo, For ex.

import sbt._
object PluginDemo extends Plugin
{
    val newTask = taskKey[Unit]("A new task.")
    val newSetting = settingKey[String]("A new setting.")

    val newSettings = Seq(
        newSetting := "test",
        newTask := println(newSetting.value)
    )
}

In my last post Create Scala Project with SBT. we had seen how it was easy with SBT to create a Scala project. In this post,we would learn multi Project Builds with SBT for Scala project.

It can be useful to keep multiple related projects in a single build, especially if they depend on one another and you tend to modify them together.Each sub-project in a build has its own src/main/scala, generates its own jar file when you run package, and in general works like any other project.

Lets quickly started with below steps :
In order to create project execute the following commands in the sbt session

D:\test>sbt
[info] Set current project to default-61ca07 (in build file:/D:/test/)
> set name :="test"
[info] Reapplying settings...
[info] Set current project to test (in build file:/D:/test/)
> set scalaVersion :="2.9.2"
[info] Reapplying settings...
[info] Set current project to test (in build file:/D:/test/)
> set version :="4.0"
[info] Reapplying settings...
[info] Set current project to test (in build file:/D:/test/)
> session save
[info] Reapplying settings...
[info] Set current project to test (in build file:/D:/test/)
> exit

If you have multiple projects, you must declare each project and how they relate in a .scala file. You can define settings for each project in .sbt files. Here’s an example of a .scala file which defines a root project test, where the test project aggregates two sub-projects, test-foo and test-bar.Defining these projects in a .scala file, which resides under test/project/build.scala,For example,

import sbt._
import Keys._
object SbtMultiBuild extends Build {
    lazy val test = Project(id = "test",
                            base = file(".")) aggregate(foo, bar)
    lazy val foo = Project(id = "test-foo",
                           base = file("foo"))
    lazy val bar = Project(id = "test-bar",
                           base = file("bar"))
}

Now creating sub-project executing following commands in the sbt session under main project

D:\test\foo>sbt
[info] Set current project to default-947bc6 (in build file:/D:/test/foo/)
> set name :="test-foo"
[info] Reapplying settings...
[info] Set current project to test-foo (in build file:/D:/test/foo/)
> set version :="2.0"
[info] Reapplying settings...
[info] Set current project to test-foo (in build file:/D:/test/foo/)
> set scalaVersion :="2.9.2"
[info] Reapplying settings...
[info] Set current project to test-foo (in build file:/D:/test/foo/)
> session save
[info] Reapplying settings...
[info] Set current project to test-foo (in build file:/D:/test/foo/)
> exit
D:\test\bar>sbt
[info] Set current project to default-aa845c (in build file:/D:/test/bar/)
> set name :="test-bar"
[info] Reapplying settings...
[info] Set current project to test-bar (in build file:/D:/test/bar/)
> set version :="3.0"
[info] Reapplying settings...
[info] Set current project to test-bar (in build file:/D:/test/bar/)
> set scalaVersion :="2.9.2"
[info] Reapplying settings...
[info] Set current project to test-bar (in build file:/D:/test/bar/)
> session save
[info] Reapplying settings...
[info] Set current project to test-bar (in build file:/D:/test/bar/)
> exit

If we compile our project from root then we can see with main project, sub-project also compile parallely, It is help full for large project which takes more time in compilation. So for resolving this problem we can develop our project under Multi Project Builds. By executing sbt compile command on console we can see
updating all projects at a time.

D:\test>sbt clean compile eclipse
[info] Loading project definition from D:\test\project
[info] Updating {file:/D:/test/project/}default-cb6aeb...
[info] Resolving com.typesafe.sbteclipse#sbteclipse-plugin;2.0.0 ...
[info] Resolving com.typesafe.sbteclipse#sbteclipse-core;2.0.0 ...
[info] Resolving org.scala-sbt#precompiled-2_8_1;0.11.3 ...
[info] Resolving org.scala-sbt#precompiled-2_9_2;0.11.3 ...
[info] Done updating.
[info] Set current project to test (in build file:/D:/test/)
[success] Total time: 0 s, completed Jan 25, 2013 2:26:59 PM
[info] Updating {file:/D:/test/}test-bar...
[info] Updating {file:/D:/test/}test-foo...
[info] Resolving org.scala-lang#scala-library;2.9.2 ...
[info] Done updating.
[info] Resolving org.scala-lang#scala-library;2.9.2 ...
[info] Updating {file:/D:/test/}test...
[info] Done updating.
[info] Resolving org.scala-lang#scala-library;2.9.2 ...
[info] Done updating.
[success] Total time: 0 s, completed Jan 25, 2013 2:26:59 PM
[info] About to create Eclipse project files for your project(s).
[info] Successfully created Eclipse project files for project(s): test-bar, test
-foo

My whole project is in test and i defined different version in test\build.sbt ,test\foo\build.sbt and test\bar\build.sbt. Now we can check project version by typing show version command on sbt session, look at below

> show version
[info] test-foo/*:version
[info]  2.0
[info] test-bar/*:version
[info]  3.0
[info] test/*:version
[info]  4.0

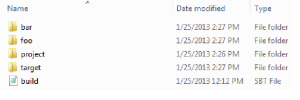
My project directory contains following sub directories :
DirImage
The project is ready to import in Eclipse IDE.That is all we need for creating Scala project using the Multi Project Buils with SBT.

I’ve recently started working with scala. I found that SBT is the best building tool for scala projects.Its not much differ from Maven and Ant,which i previously used for java projects.There are several advantages using sbt.For example,if we defining a complex scala project in Maven then it turns in more plugins but with SBT,there is no need to additional plugins.

Lets quickly get started with installing sbt
for Windows
Create a batch file sbt.bat which contains following script

   $ set SCRIPT_DIR=%~dp0
   $ java -Xmx512M -jar "%SCRIPT_DIR%sbt-launch.jar" %*
   

Now, put the sbt-launch.jar file in same directory where you put sbt.bat file.Put sbt.bat on your path so that you can launch sbt in any directory by typing sbt at the command prompt.
Once you set path,you can excute sbt command on your command prompt and look like below(in my case)

C:\Users\ANUJ>sbt
[info] Loading project definition from C:\Users\ANUJ\.sbt
[info] Set current project to default-73e841 (in build file:/C:/Users/ANUJ/)

To create a new project,Create a project directory with source code
A sbt project directory can be contains a single source file.Now we create a directory named test with a file hello.scala which contains following code:

object Hello{
def main(args:Array[String]) =Println("Hello,Scala World !")
}

Now from inside test directory,start sbt and type run at the sbt console. On windows commands look like this

D:\test>sbt
[info] Set current project to default-61ca07 (in build file:/D:/test/)
> run
[info] Compiling 1 Scala source to D:\test\target\scala-2.9.1\classes...
[info] Running Hello
Hello,Scala World ![success] Total time: 7 s, completed Jan 21, 2013 11:15:09 AM

We can see above my project is successfully executed.
Now there is another segments is that most projects needs manual setup.Basic build setting put in a file named as build.sbt and resides under the project base directory.
For example,my project base dirctory is test,in test/build.sbt contains below entries:

name := "test"
version := "1.0"
scalaVersion := "2.9.1"

Now, we would like to continue with Eclipse IDE,Suppose you have already installed the scala plugins and you can now import you existing project,
Start from an existing sbt project
Sbt is the standard building tool for scala project.I have used sbt0.12.x version of sbt.Follow the instructions to install plugins for eclipse.These plugins generate the project definition.
Steps for adding plugins for Eclipse,
1.Add sbteclipse to your plugin definition file at test/project/plugins.sbt.which contains

addSbtPlugin(“com.typesafe.sbteclipse” % “sbteclipse-plugin” % “2.1.1”)

2. In sbt use the command eclipse to create Eclipse project files,
On my command prompt look like this,

> eclipse
[info] About to create Eclipse project files for your project(s).
[info] Updating {file:/D:/test/}default-61ca07...
[info] Resolving org.scala-lang#scala-library;2.9.1 ...
[info] Done updating.
[info] Successfully created Eclipse project files for project(s):
[info] test

Once you have successfully executed eclipse command,then you can start eclipse and import existing sbt project as File -> import -> Existing Projects in to workspace.

Twitter is great for sharing interesting things you find on the web. In fact, close to a quarter of all Tweets include a link in them. Despite the high volume of sharing, there is plenty of room to make it easier.
So, I have recently created “Share on Twitter” functionality in my application. Now you can use this functionality too with yours application.

Lets quickly start to add Tweet Button
For Try out your button, you just copy and paste the code below into the HTML where you want to add tweet
button.

<a id="b" class="" href="https://twitter.com/intent/tweet?original_referer=https%3A%2F%2Ftwitter.com%2Fabout%2Fresources%2Fbuttons&amp; text=@TwitterTweet.setMesasgeForTweet(job)" target="_blank" rel="noopener">
<i></i>
<span id="l" class="">
<img title="Click to share on Twitter" alt="Tweet" />
</span>
</a>
!function(d,s,id){var js,fjs=d.getElementsByTagName(s)[0];
if(!d.getElementById(id)){js=d.createElement(s);js.id=id;js.src="//platform.twitter.com/widgets.js";
fjs.parentNode.insertBefore(js,fjs);}}(document,"script","twitter-wjs");

Note : In above code you can configure tweet button accordingly, For ex.
text: You can give Tweeting contents within text.
image: Under img src you can give tweet button image which one you like

Once you add above code in your application then you can get tweet button functionality with your application. After clicking tweet button following twitter signin window appear,

tweetsignup

After Sign in tweet window appear as given below

tweet

Same as Tweet Button you can also create Follow Button for Twitter. For achieve this functionality you
can just copy and paste below code in your html.

<a class="twitter-follow-button" href="https://twitter.com/singhsomvanshi">Follow @singhsomvanshi</a>
!function(d,s,id){var js,fjs=d.getElementsByTagName(s)[0];
if(!d.getElementById(id)){js=d.createElement(s);js.id=id;js.src="//platform.twitter.com/widgets.js";
fjs.parentNode.insertBefore(js,fjs);}}(document,"script","twitter-wjs");

Following window look like as below

Following

I hope you will enjoy using this Tweeting and following button functionality in your web application. Please try this out for yourself to see how it works.

I’ve recently started working with scala. I found it to be simple to start with. Scala offers Map Concept ,Maps allows us to store a collection of key-value pairs and to access the values by the keys associated with them,Scala provides mutable and immutable versions of map.There is a base map trait in package scala.collection ,and there is also two sub maps in packages scala.collection.mutable and scala.collection.immutable.
Lets us look at a quick example

scala> val worldMap=Map("Asia"->"India","Europe"->"France")
 worldMap: scala.collection.immutable.Map[java.lang.String,java.lang.String] = Map(Asia -> India, Europe -> France)
 scala> print(worldMap)
 Map(Asia -> India, Europe -> France)
 

In this example, Scala declares val  as worldMap type (String, String). It is actually a Map[String, String] type.
By default it is immutable type of Map.If you prefer to use mutable Map then you have to import scala.collection.mutable.Map . For example,

scala> import scala.collection.mutable.Map
import scala.collection.mutable.Map
scala> val worldMap=Map("Asia"->"India")
worldMap: scala.collection.mutable.Map[java.lang.String,java.lang.String] = Map(Asia -> India)
scala> worldMap +=("Africa"->"Kenya")
res2: worldMap.type = Map(Asia -> India, Africa -> Kenya)

In above example, you can see ,initially worldMap contains single key-value pair ,then after we add another key-value pair in worldMap. This is possible because worldMap type is mutable Map. if we can try this with the immutable Map then error would be appeared, For example,

scala> import scala.collection.immutable.Map
import scala.collection.immutable.Map
scala> val worldMap=Map("Asia"->"India")
worldMap: scala.collection.immutable.Map[java.lang.String,java.lang.String] = Map(Asia -> India)
scala> worldMap +=("Africa"->"Kenya")
:12: error: reassignment to val
 worldMap +=("Africa"->"Kenya")

Here reassignment error is occurred due to immutable Map type.
Accessing Map values :
In Scala, the analogy between functions and maps is particularly close because you use the () notation to look up key values. For example,

scala> val country=worldMap("Asia")
country: java.lang.String = India
scala> val country=worldMap("Africa")
country: java.lang.String = Kenya

If the map doesn’t contain a value for the requested key, an exception is thrown.To check if there is a key with the given value, call the contains method,For example,

scala> val country=worldMap("Europe")
java.util.NoSuchElementException: key not found: Europe
scala> val country=if(worldMap.contains("Europe")) worldMap("Europe") else 0
country: Any = 0
scala> val country=if(worldMap.contains("Asia")) worldMap("Asia") else 0
country: Any = India

Filter Map by Key Set
To filter a Map keeping only the entries where the key is contained in a given Set

scala> val worldMap=Map("Asia"->"India","Europe"->"France")
worldMap: scala.collection.immutable.Map[java.lang.String,java.lang.String] = Ma
p(Asia -> India, Europe -> France)

scala> worldMap.filterKeys(Set("Asia"))
res0: scala.collection.immutable.Map[java.lang.String,java.lang.String] = Map(As
ia -> India)

Updating Map Values :
In a mutable map, you can update a map value, or add a new one,For example,

scala> worldMap("Asia")="Japan"
scala> print(worldMap)
Map(Asia -> Japan, Africa -> Kenya)
scala> worldMap("Africa")="Mali"
scala> print(worldMap)
Map(Asia -> Japan, Africa -> Mali)
scala> worldMap +=("Europe"->"France")
res10: worldMap.type = Map(Europe -> France, Asia -> India, Africa -> Mali)

Iterating Over Map with Scala
Scala provides several different ways to iterate over a Map, below are some useful examples:

<strong>Example 1:</strong>
scala&gt; val worldMap=Map("Asia"-&gt;"India","Europe"-&gt;"France")
worldMap: scala.collection.immutable.Map[java.lang.String,java.lang.String] = Map(Asia -&gt; India, Europe -&gt; France)
scala&gt; worldMap.foreach((w)=&gt;println("Continent:" + w._1 + "  Country :" + w._2))
Continent:Asia  Country :India
Continent:Europe  Country :France

In this example, the _1 maps to the key and the _2 maps to the value of the element w in the current iteration.
Example 2: Using a for-comprehension loop iterating Map

scala> val worldMap=Map("Asia"->"India","Europe"->"France")
worldMap: scala.collection.immutable.Map[java.lang.String,java.lang.String] = Ma
p(Asia -> India, Europe -> France)
scala> for ((key, value) <- worldMap) println("Continent: " + key + " Country: "
 + value)
Continent: Asia Country: India
Continent: Europe Country: France
 

This is known as JIT (just in time) user provisioning. User provisioning is intended to make the creation, management and deactivation of login IDs, security entitlements . This is done by automating and codifying business processes such as on boarding and termination and connecting these processes to multiple systems.

SSO (Single Sign On) is a very useful way to login to multiple applications with just one credential that user only need to enter on the identity management system (ADFS, Okta). But starting an SSO integration for a customer had a pre-requisite to create all users in advance in any company, only then they will be able to login to that company.

However SSO should offer complete automation without users being need to be managed in  any client application .

Below is the steps to create user provisioning  –

Read the rest of this entry »